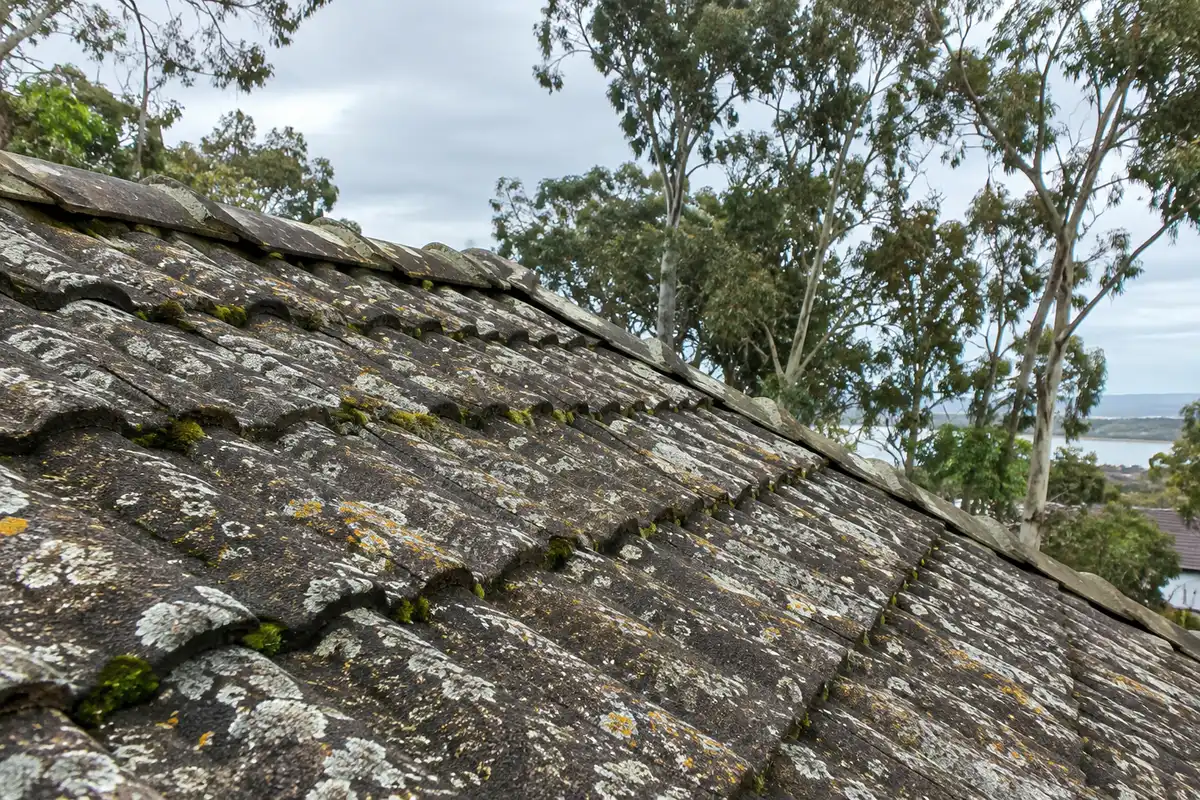
You’re hanging washing out, glance up, and notice the back half of the roof has gone a patchy grey and yellow. Up close it looks like flaky crusts stuck to the tiles, maybe with a bit of green moss tucked into the joints. The front of the house looks fine. So is the lichen on the roof just ugly, or is it actually doing damage?
The honest answer is: a bit of both, and it depends on what the roof is made of and how old it is. We see a lot of it around Shellharbour, and the right response ranges from “leave it for now” to “deal with it before the tiles give up”. Here’s how to tell which one you’re looking at.
Lichen and moss are not the same thing
People use the two words interchangeably, but they behave differently on a roof.
Lichen is a fungus and an alga living together as one organism. It forms flat, crusty patches, usually grey, pale green, yellow or orange, and it grips the surface with tiny root-like anchors. It grows slowly and it does not let go easily.
Moss is a small plant. It sits in soft green clumps, mostly in the gaps between tiles, in valleys and along gutters, wherever dirt and moisture collect. It holds water like a sponge but it doesn’t bond to the surface the way lichen does.
Most roofs we look at have both, along with black streaks of algae or mould. They all have the same cause: a surface that stays damp and doesn’t get much sun.
Why the shady side of the house gets it first
On almost every affected roof, the growth is worst on the south facing slopes, under overhanging trees, and on sections shaded by a neighbour’s house or a second storey. Those areas dry out slowly after rain and dew, so spores get a chance to settle in.
Around Shellharbour, the coastal moisture helps it along. Homes backing onto bushland or with mature gums over the roof tend to have it heavier, because leaf litter and shade keep the tiles damp for longer. Older concrete tiles are the most common host. Once the original surface coating wears off, the concrete underneath is rough and porous, which is exactly what lichen likes to grab onto.
When lichen on a roof becomes a real problem
A few small patches on a sound roof are mostly cosmetic. It becomes a maintenance issue when it starts doing one of these things:
- Eating into the tile surface. Lichen releases mild acids as it grows. On concrete tiles that slowly breaks down the surface, leaving the tile more porous, so it holds more water and weathers faster.
- Holding water against the roof. Thick moss and lichen keep the tiles wet for days after rain, which speeds up wear on tiles, bedding and pointing.
- Blocking the water path. Moss in tile laps and valleys can push water sideways instead of letting it run down to the gutter. That’s how a roof with no broken tiles can still leak.
- Clogging gutters and downpipes. Dead growth washes off in clumps and ends up in gutters, where it sits with the leaves and causes overflows.
If you’re seeing heavy growth along with crumbling pointing on the ridge, cracked tiles or a ceiling stain, the lichen is probably a sign the roof needs a proper look, not just a clean. We go through exactly what we check in our guide to what a roof inspection covers.
What about lichen on a Colorbond roof?
This one surprises people, because steel seems like the last place anything would grow. It does happen, usually on lower pitched sections under trees, or on parts of the roof that sit under an overhang and never get a proper rinse from the rain.
On metal the concern is different. Anything that keeps the sheet damp and traps dirt against the paint can shorten the life of the coating, and that matters more close to the coast where salt is already working on it. The fix is gentle: a mild cleaning solution, plenty of fresh water and a soft brush. Never use a wire brush, scouring pad or strong solvent on Colorbond, because once the paint film is scratched you’ve created the very weak spot you were trying to protect.
Killing it first, then letting it go
The biggest mistake we see is someone trying to blast live lichen off with a pressure washer. Lichen hangs on hard, so the water pressure needed to shift it is high enough to strip the surface off old concrete tiles, wash out the pointing, and drive water up under the tile laps into the roof space. You end up with a clean looking roof that’s in worse shape than before.
The approach that works is slower:
- Apply a roof treatment designed to kill lichen and moss, following the label for your roof type.
- Give it time. The growth dies, changes colour and loosens its grip, then rain gradually breaks it down over the following months.
- Once it’s dead and loose, a low pressure wash or gentle brushing removes what’s left without hurting the roof.
- Clear the gutters and downpipes afterwards, because that’s where the debris ends up.
One thing to check before anything goes on the roof: if you have a rainwater tank, disconnect or divert the downpipes feeding it until the treatment has washed through. You don’t want cleaning chemicals in your drinking or garden water.
Removing overhanging branches helps more than most people expect. More sun and airflow on that slope means it dries faster, and the growth takes much longer to return.
Doing it yourself vs getting a roofer up there
Spraying a treatment from the ground with a hose attachment is a reasonable DIY job on a single storey home. Getting onto the roof is a different matter. Damp, mossy tiles are slippery, and older concrete or terracotta tiles crack easily if you don’t know where to step. A cracked tile you can’t see from the ground is a common way a cleaning job turns into a leak repair.
When we clean a roof we’re on it anyway, so we use that time to note cracked tiles, tired pointing, rusted valley iron and blocked gutters. If the growth is heavy and the tiles are porous underneath, cleaning is often the first step before resealing or a full restoration rather than a job on its own. If that’s where your roof is heading, our breakdown of what a roof restoration costs explains what drives the price.
For roofs that just need the growth gone and the gutters cleared, our roof cleaning service covers tile and metal roofs across the Shellharbour region, done in a way that doesn’t damage the surface you’re trying to protect.
Common questions about roof lichen and moss
Is lichen on the roof damaging?
Over time, yes. It slowly breaks down the surface of concrete tiles and keeps the roof damp, which speeds up general wear. A few small patches aren’t urgent, but heavy growth on older tiles is worth dealing with before the tiles become porous and brittle.
How do I get rid of lichen on my roof?
Kill it first with a roof treatment made for lichen and moss, then let it die off and loosen before removing what’s left with a gentle wash or brush. Trying to pressure wash live lichen off usually damages old tiles and can push water into the roof space.
What kills lichen on a Colorbond roof?
Use a treatment that is safe for painted steel, applied according to its label, followed by a thorough rinse with fresh water and a soft brush. Avoid abrasive pads, wire brushes and strong solvents, because scratching the paint film exposes the steel underneath, which is a bigger worry near the coast.
Does vinegar or a natural remedy kill roof lichen?
Household remedies can knock back small patches on things like paths, but they’re hit and miss on an established roof and still need someone to apply them up there. For a whole roof, a purpose made treatment is more reliable and you’re only taking the safety risk once.
What causes lichen on roof tiles?
Shade, moisture and a rough surface. South facing slopes, overhanging trees and older concrete tiles that have lost their surface coating are where we find it most. Cutting back branches so the roof dries faster is one of the best ways to slow it returning.
Should I pressure wash moss and lichen off my roof?
Not while it’s still alive. The pressure needed to shift live lichen can strip the surface from concrete tiles, wash out pointing and force water under the tiles. Once it has been treated and has died off, a low pressure clean is fine.